
Local Ingress Domains for your Kind Cluster
Tools like minikube and kind make it easy to get a kubernetes cluster up and running locally.
Unfortunately these tools are limited in their capabilities, namely a lack of load balancer support.
As a result, the community developed solutions like kubefwd and minikube tunnel to expose services.
While this approach works, keeping a dedicated terminal open during development can be tedeous.
In this post, I show how to set up an ingress controller in a kind cluster and pair it with a private, locally addressable domain.
Setup dnsmasq
dnsmasq is a free tool that provides domain name system (DNS) capabilities. Using dnsmasq, we’re able to setup a synthetic domain thats managed by localhost. Before getting started, let’s install dnsmasq. On OSX, you can install dnsmasq using homebrew.
brew install dnsmasqThe default configuration for dnsmasq on OSX can be found at /usr/local/etc/dnsmasq.conf.
To configure a local private domain, add an address line to the end of the file.
When choosing a domain, I suggest avoiding .local and .dev top level domains (TLD).
.local addresses are reserved for multicast domains.
Using one will result in DNS query leaks, which may be problematic for organizations.
.dev has historically been used by engineers, but recent browser changes now require TLS for communication.
I’ve recently taken to the non-existent .hack TLD.
address=/mjpitz.hack/127.0.0.1
server=8.8.8.8
server=8.8.4.4
Edit #1: I recently ran into an issue with this setup. I also add the Google nameservers to list.
Once configured, you’ll need to start (or restart) the dnsmasq service.
sudo brew services start dnsmasq
# or
sudo brew services restart dnsmasq
You can verify that dnsmasq picked up your configuration using the dig command.
For now, you’ll need to explicitly point it at localhost.
$ dig @127.0.0.1 test.mjpitz.hack

; <<>> DiG 9.10.6 <<>> test.mjpitz.hack
;; global options: +cmd
;; Got answer:
;; ->>HEADER<<- opcode: QUERY, status: NOERROR, id: 30399
;; flags: qr aa rd ra; QUERY: 1, ANSWER: 1, AUTHORITY: 0, ADDITIONAL: 1

;; OPT PSEUDOSECTION:
; EDNS: version: 0, flags:; udp: 4096
;; QUESTION SECTION:
;test.mjpitz.hack.		IN	A

;; ANSWER SECTION:
test.mjpitz.hack.	0	IN	A	127.0.0.1

;; Query time: 0 msec
;; SERVER: 127.0.0.1#53(127.0.0.1)
;; WHEN: Wed Oct 21 21:12:02 CDT 2020
;; MSG SIZE  rcvd: 61
Configure the resolver
Once we’ve configured dnsmaq, we’ll need to setup a resolver.
Create a file under /etc/resolver with the name of the domain from earlier.
The file should contain a domain, search, and nameserver.
The nameserver should point to 127.0.0.1.
sudo mkdir /etc/resolver/

cat <<EOF | sudo tee /etc/resolver/mjpitz.hack
domain mjpitz.hack
search mjpitz.hack
nameserver 127.0.0.1
EOF
Once we configure the resolver, we’ll need to restart the mDNSResponder.
The easiest way to do this is by sending a hang up.
This will cause the process to be restarted gracefully.
sudo killall -HUP mDNSResponderOnce restarted, verify the new resolver was picked up using the scutil command.
scutil --dns

# ...

resolver #8
  domain   : mjpitz.hack
  search domain[0] : mjpitz.hack
  nameserver[0] : 127.0.0.1
  flags    : Request A records, Request AAAA records
  reach    : 0x00030002 (Reachable,Local Address,Directly Reachable Address)
Configure network manager
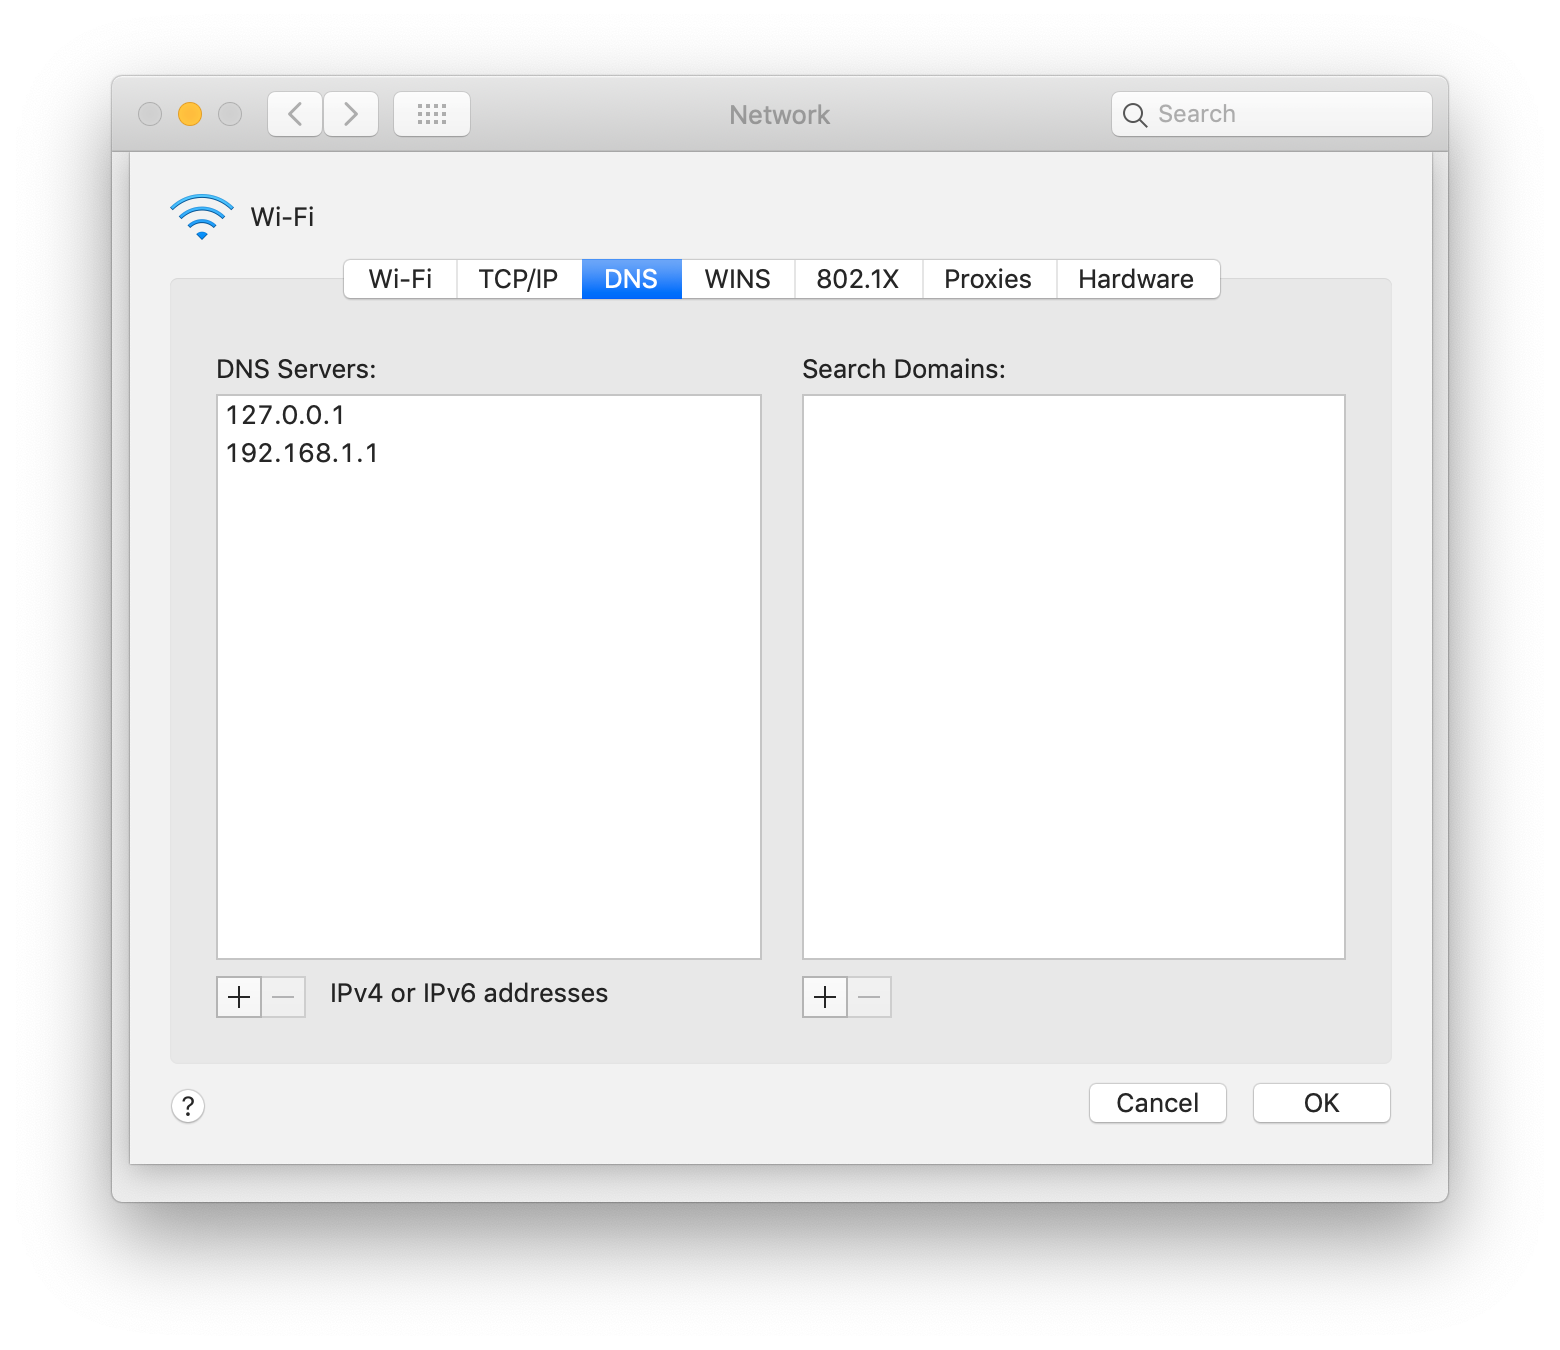
The last step of the process is to add your local DNS server to your network manager.
I personally find this easiest to do through the Network Preferences section.
You only need to set it up once, so doing it manually isn’t too bad.
Add 127.0.0.1 to the list of the addresses already shown.
Once configured, be sure to apply the configuration.
Edit #2: I recently ran into an issue with this setup.
Instead of adding 127.0.0.1 to the list, I now set it so it’s the only one.
This relies on the server entries that were added to dnsmasq.conf.
At this point, your networking should be properly configured.
To test, we’ll use the same dig command from earlier.
Instead of pointing it at localhost this time, we’ll omit the target.
The result should be the same.
$ dig test.mjpitz.hack

; <<>> DiG 9.10.6 <<>> test.mjpitz.hack
;; global options: +cmd
;; Got answer:
;; ->>HEADER<<- opcode: QUERY, status: NOERROR, id: 29448
;; flags: qr aa rd ra; QUERY: 1, ANSWER: 1, AUTHORITY: 0, ADDITIONAL: 1

;; OPT PSEUDOSECTION:
; EDNS: version: 0, flags:; udp: 4096
;; QUESTION SECTION:
;test.mjpitz.hack.		IN	A

;; ANSWER SECTION:
test.mjpitz.hack.	0	IN	A	127.0.0.1

;; Query time: 0 msec
;; SERVER: 127.0.0.1#53(127.0.0.1)
;; WHEN: Wed Oct 21 21:12:02 CDT 2020
;; MSG SIZE  rcvd: 61
Now that we’ve got a synthetic domain that routes properly, we can deploy and configure our kind cluster.
Creating the cluster
Before creating the cluster, be sure you have kind installed and are on the latest version.
brew install kindOnce installed, we can follow the directions as outlined in the documentation.
As we follow along, lets dive into some of the configuration a bit more.
First, we’re creating a cluster configuration which adds port mappings for both HTTP and HTTPS.
Below, I’ve provided a modified configuration that binds the ports to localhost instead of 0.0.0.0.
# cluster.yaml
kind: Cluster
apiVersion: kind.x-k8s.io/v1alpha4
nodes:
- role: control-plane
  kubeadmConfigPatches:
  - |
    kind: InitConfiguration
    nodeRegistration:
      kubeletExtraArgs:
        node-labels: "ingress-ready=true"
  extraPortMappings:
  - containerPort: 80
    hostPort: 80
    listenAddress: 127.0.0.1  # omit for 0.0.0.0
    protocol: TCP
  - containerPort: 443
    hostPort: 443
    listenAddress: 127.0.0.1  # omit for 0.0.0.0
    protocol: TCP
  #image: kindest/node:v1.16.4 # configure kubernetes version
Using this configuration, we can create a cluster.
kind create cluster --config cluster.yamlOnce the cluster is up and running, verify that port 80 and 443 bound properly.
You can do this by inspecting the docker container.
$ docker ps
CONTAINER ID        IMAGE                  COMMAND                  CREATED              STATUS              PORTS                                                                     NAMES
db95e53f6876        kindest/node:v1.19.1   "/usr/local/bin/entr…"   About a minute ago   Up About a minute   127.0.0.1:80->80/tcp, 127.0.0.1:443->443/tcp, 127.0.0.1:55416->6443/tcp   kind-control-plane
Deploying an ingress controller
Once your cluster is up and running, it’s time to deploy an ingress controller.
Ingress controllers enable routing of HTTP requests based on the Host header.
While it’s tempting to use your ingress controller of choice, let’s start simply with ingress-nginx.
kubectl apply -f https://raw.githubusercontent.com/kubernetes/ingress-nginx/master/deploy/static/provider/kind/deploy.yamlLooking at the configuration, we see that the service uses a NodePort instead of your typical LoadBalancer.
This routes communication arriving on the node’s port 80 and 443 to ingress-nginx’s port 80 and 443, respectively.
apiVersion: v1
kind: Service
metadata:
  labels:
    # ...
  name: ingress-nginx-controller
  namespace: ingress-nginx
spec:
  type: NodePort
  ports:
    - name: http
      port: 80
      protocol: TCP
      targetPort: http
    - name: https
      port: 443
      protocol: TCP
      targetPort: https
  selector:
    # ...
If you decide to deploy your own custom ingress controller, you need to ensure that its service is set up similarly.
Putting it all together
So, what does this mean exactly?
Well.
We know that your host is forwarding communication with port 80 and 443 to the kind container.
We know that the kind container is forwarding communication with port 80 and 443 to the ingress controller.
This means that when you call localhost:80 or localhost:443 from your machine, the traffic is being handled by the ingress controller.
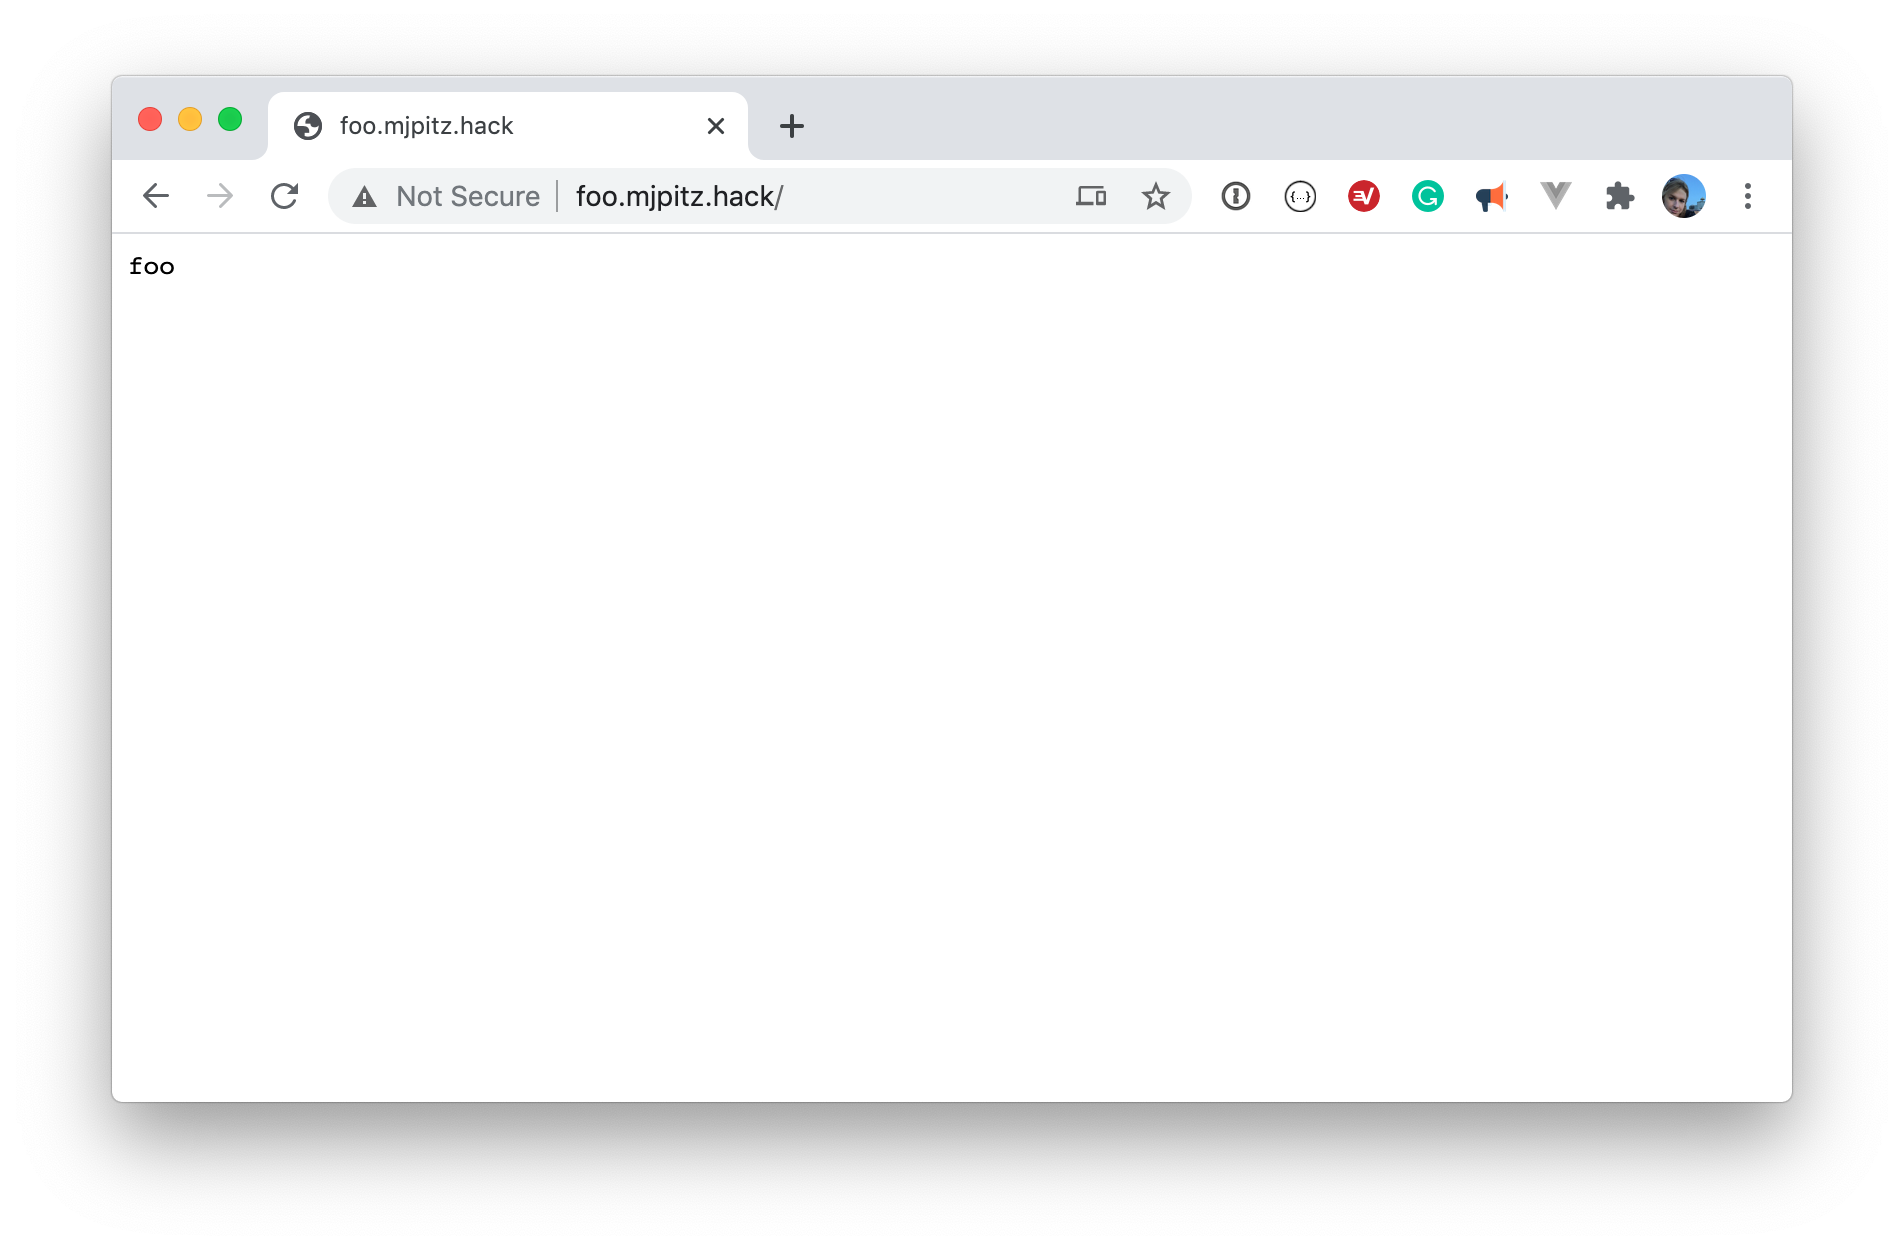
You can verify that the traffic reaches the container by opening it up in your browser.
Why setup a local, private domain?
Sure. You could follow the path as described in the kind documentation. Managing path based routing can be a headache and often doesn’t align with how things are deployed in production. By leveraging a local private domain, we make our dev ecosystem look and feel much closer to production. Let’s take a look at this in action using the example from the kind documentation. Instead of using path based routing, let’s set up two ingress definitions with our fake domain.
---
apiVersion: networking.k8s.io/v1beta1
kind: Ingress
metadata:
  name: foo.mjpitz.hack
spec:
  rules:
  - host: foo.mjpitz.hack
    http:
      paths:
      - path: /
        backend:
          serviceName: foo-service
          servicePort: 5678
---
apiVersion: networking.k8s.io/v1beta1
kind: Ingress
metadata:
  name: bar.mjpitz.hack
spec:
  rules:
  - host: bar.mjpitz.hack
    http:
      paths:
      - path: /
        backend:
          serviceName: bar-service
          servicePort: 5678
And just like that, you’re off to communicating with your services using an ingress.

No need for complicated path based routing. No need to fuss with long running process. Just simple, straightforward, ingress definitions.
I hope you enjoyed this post and hope it helps simplify your developer workflow. Thanks for reading!